|
 |
 |
 |
 |
 |
 |
 |
 |
 |
 |
| |
Ironman
Rules General
Tips
Pre-game, Hotkeys, Join order, Shopping, Gold
and TP scrolls. Basic tactics. Cooperation
Psychology, Communication, About items, When lvling up, Potions,
Spell components, Shrines. Tactics
Battle formations
The Butcher and King Leoric
Melee
vs Leo - Charis
Bats
Catacombs
and Caves
Dog Bosses
Hiddens & Swarmed
Roomful
of skel archers
Lazarus and Diablo Town
Portal
Uses for Town Portal, TPRes, TPKill - Kill the
Butcher safely, TPKill2 - Hit and run
Miscellaneous
Be a good golem/shield
Hall of the Walking Dead
Charged
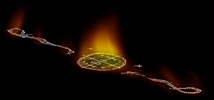
Bolt
Firewall
Exp points & Charis Factor
Sharing
items for specific tasks
The fine art of dying
Variations on team makeup
Advantages of various makeup
Experience Hog Strategy
Warrior Hog, Rogue
Hog, Mage Hog
(Greyed Text = NA)
Ironman
Victories
Friar,
Gumby and Kshira
Charisycho and KoPsycho
Cy_2k (solo)
KoPhanTom (solo)
Roede and Taoni
Saga of Roede and
Taoni
End of the Universe
Tale of Iron_Tao
Attica(IMSNOB)
Triple
Crown -Roede
& Taoni
Triple
Crown -Lock In by
Plague, Hariel and Shade
Additional
Articles
Warrior Treaties
- Charis
Mage Treaties
- Friar.Fuk
Rogue
Treatise - Cyrene
Buff
Warrior - Attika
Cave
Guide - Cyrene
Tips
Collection - Others
Thinking
Cap - Attika |
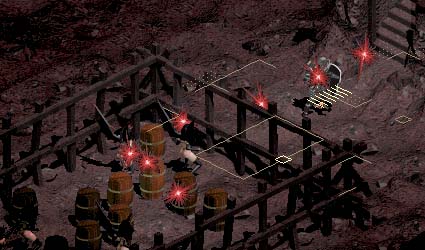
| | Catacombs
and Caves
The Catacombs/Caves layouts are different from the Churches/Hell. Too often,
the game place monsters right next to the stairway and will create a quite
chaos when the whole party gets ambushed.
 There's
not enough time nor room to maneuver the party strategically... you can't
even run back up the stair because your teammate is blocking it, all the
while thinking "My team needs me now!" When entering a new level
in the Cats and Caves, the warrior should go down first (you don't want
the mage to do this, think Hiddens). He may even walk around a couple
of squares (be careful not to wander into the line of sight of other corridors)
if there are no monsters next to the stair just to reveal any Hidden type
monsters. The warrior may give the signal for the rest of the party to
come down once he deems it safe. If there are monsters setup next to the
stair, go back up right away - This is to avoid activating more monsters
and not giving the monsters a chance to move in closer to the stair. If
you ignore these tips, at least pay attention to the speed the levels
loads for each player. Let the mage go down last (and wait a bit if his
computer loads the levels much faster) to avoid the chance of him facing
Hidden type monsters alone. There's
not enough time nor room to maneuver the party strategically... you can't
even run back up the stair because your teammate is blocking it, all the
while thinking "My team needs me now!" When entering a new level
in the Cats and Caves, the warrior should go down first (you don't want
the mage to do this, think Hiddens). He may even walk around a couple
of squares (be careful not to wander into the line of sight of other corridors)
if there are no monsters next to the stair just to reveal any Hidden type
monsters. The warrior may give the signal for the rest of the party to
come down once he deems it safe. If there are monsters setup next to the
stair, go back up right away - This is to avoid activating more monsters
and not giving the monsters a chance to move in closer to the stair. If
you ignore these tips, at least pay attention to the speed the levels
loads for each player. Let the mage go down last (and wait a bit if his
computer loads the levels much faster) to avoid the chance of him facing
Hidden type monsters alone.
In certain situations
such as going down to level 6 (where there is no second entry point unless
you want to fight your way back up from lvl 9. Besides, you wouldn’t
have the required Clvl to enter other sections from town) and get swarmed
right away, you may not be able, or be wise to escape back up the stair.
The advice here is to always have TP as a readied spell when going down
the Cats/Caves as a scout. In that case you should cast a Town Portal
as far away from the stair as possible. The TP serves as an alternate
entry point in case you die at the stair. But more importantly, you want
to stay alive and try to escape via the TP thus giving the party enough
time to react when coming down the stair. Also take note of the nearest
wall from your entry point, the team can then gather there to make a Wall
formation if it is not packed with monsters in between.
For checking new doors
in the cats, switch to the Mage Shotgun formation. Mage checks door and
cast Fire Wall as he sees fit. The mage can also cast Fire Wall into a
door-less room without being seen - same as in the Deathspit and Chaoshowler
section.
Use TPKill in Caves
when encountering range attackers across an impassable (long way from
opening) lava stream when there’s no way around it.
Mage with Holy Bolt
staff may want to use up the charges by the end of the Catacombs since
HB is totally useless upon entering the Caves, except against Diablo of
course. You’ll probably need to make room for new finds anyway. With
a HB flinging mage, the battle formation can be tighten up a bit by having
the mage walk directly behind the warrior. Also, it will free the warrior
from having to change from sword to blunt weapon. The others should try
to leave all the undead for the mage with a HB stick because it is quite
difficult to level him after the Churches without major mana consumption,
(especially without Fwall spell) and because doing melee beside the warrior
begins to make less sense due to the mage’s low Tohit. Make exception
if you plan to make it to Diablo and you don’t have the Holybolt
spell.

Catwalk
Formation
A normal walking formation for corridor with enough room for 3 - This
is almost a reverse of the SNIPER formation. The lack of good battle formation
is also a major problem in the Cats. Most corridors are simply too narrow
to have any formation at all. If the other 2 fall behind the warrior as
they walk, he pretty well has to work alone since the rogue and mage don't
have enough room for a "safe" firing angle.
The mage and rogue
walks a few steps behind the warrior while the warrior hugs the outer
wall. When monsters are activated they will be lured to the warrior/outer
wall, exposing them to the rogue and mage's fire. If not a swarm situation
the warrior can then move down (west) one tile, mage move up and whack
beside the warrior. By hugging the outer wall you will actually activates
even less monsters if moving one tile at a time like a good golem should.
Some monsters will be activated 3-4 steps before the warrior steps into
the hall; stop advancing or retreat a step to wait for the monsters to
come to you. Otoh, if the warrior hugs the inside wall as he advances,
he will have to be closer to the explored corridor before he sees any
monsters, and he will have activated most of them by then.
 This
formation gives the warrior some room to retreat without going behind
his partners and therefore exposing them to monster attacks. The BOW rogue
should stay put a few steps behind, no need for her to get mixed up in
the crowd adding to the confusion and pin cushion her partners when they
need to retreat. This
formation gives the warrior some room to retreat without going behind
his partners and therefore exposing them to monster attacks. The BOW rogue
should stay put a few steps behind, no need for her to get mixed up in
the crowd adding to the confusion and pin cushion her partners when they
need to retreat.
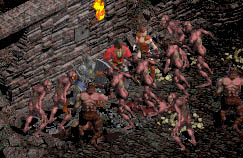
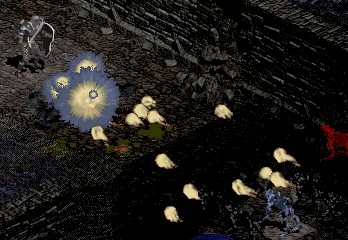
Hiddens
and getting swarmed
Protect your jujuman! Stay close to him, you could have walked by a bunch
of Hiddens and not see them, then they would appear out of nowhere and
ambush the mage. The Hidden type monsters (Hiddens, Stalkers, Unseen and
Illusion Weavers) are probably your worst enemies in an Ironman game in
the way that the team can get swarmed unexpectedly, and not due to any
flaw of their tactic. If the mage gets singled out by Hiddens the chance
of a mage’s survival is not good… it would be costly even if
the mage manages to stay alive. The mage should cast Mana Shield if the
spell is available, and stay close to your partners. The following tactic
deals with all situations when swarmed by melee monsters. Think battle
formation!
Sometimes the party
just has to dig in and fight, for it is not always possible for the party
to retreat. As soon as the party senses a swarm situation they should
signal for battle formation. Three formations are presented here; they
are the “WALL”, “CORNER” and “SNIPER”
|
 The
Wall - The team put their backs to a wall with the mage in the
middle. This reduces the maximum number of monsters that can get
at the team at one time, 7 in this case. The monster attacks are
split between the warrior (4) and rogue (3) due to join order. Not
the best situation, but the important thing is that mage is freed
from attacks. The quick WALL formation is used when there are monsters
coming form all directions and if the corners are unexplored territories.
If the team can get to a corner, use the following WALL formation. The
Wall - The team put their backs to a wall with the mage in the
middle. This reduces the maximum number of monsters that can get
at the team at one time, 7 in this case. The monster attacks are
split between the warrior (4) and rogue (3) due to join order. Not
the best situation, but the important thing is that mage is freed
from attacks. The quick WALL formation is used when there are monsters
coming form all directions and if the corners are unexplored territories.
If the team can get to a corner, use the following WALL formation.
|
|
 Corner
Wall - Note that the mage is now tugged in the corner with rogue
next to warrior. The monster number is now reduced to 5, 2 less
for the rogue (If the rogue is s/s setup with decent AC, she can
switch position with the warrior to take some heat off him by dividing
the monsters into a “2-3 split” vs “4-1” as
shown). The mage is still freed from attacks. One nice bonus with
the WALL formations is the efficient use of Fire Wall if available.
Use the Shift key to avoid falling into the fire when a Fire Wall
is cast, and attack the monsters not standing in the fire first. Corner
Wall - Note that the mage is now tugged in the corner with rogue
next to warrior. The monster number is now reduced to 5, 2 less
for the rogue (If the rogue is s/s setup with decent AC, she can
switch position with the warrior to take some heat off him by dividing
the monsters into a “2-3 split” vs “4-1” as
shown). The mage is still freed from attacks. One nice bonus with
the WALL formations is the efficient use of Fire Wall if available.
Use the Shift key to avoid falling into the fire when a Fire Wall
is cast, and attack the monsters not standing in the fire first.
|
|
 The
Corner - Same as the “2-3 split” above with the advantage
of less confusion when getting into positions. The
Corner - Same as the “2-3 split” above with the advantage
of less confusion when getting into positions.
The mage is
not being threatened in either formation so he can provide support
with magic attacks or just whack with his staff. The team can outlast
a swarm when the mage provides a steady stream of Heal Other to
his teammates. One advantage with the WALL formation over the CORNER
formation is that the mage can play the role of the “SNIPER”.
He can slip out when it’s safe, to get a wider angle of firing
and render support to whoever needs it most.
|
|
 In
certain situations, the party may be able to fall into the SNIPER
formation without forming the WALL first. Note also the rogue took
the corner after the mage slipped out. A more desirable variation
to the SNIPER formation would have both the rogue and mage playing
snipers. The warrior might look like he’s in over his head,
but he is actually in better shape than in the other formations
because the maximum number of attacks is reduced to 3. In
certain situations, the party may be able to fall into the SNIPER
formation without forming the WALL first. Note also the rogue took
the corner after the mage slipped out. A more desirable variation
to the SNIPER formation would have both the rogue and mage playing
snipers. The warrior might look like he’s in over his head,
but he is actually in better shape than in the other formations
because the maximum number of attacks is reduced to 3.
Note:
The above are not the best forms of the Sniper formations, however,
they are effective and quick to assemble incases of a swarm situation.
More of the Sniper formation is cover in the Battle
Formations section.
|
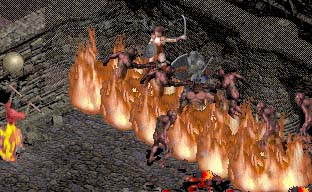
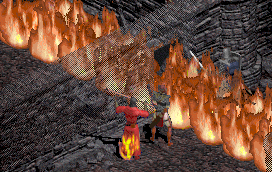
Deathspit
and Chaoshowler
These two spitters are really not as scary and tough as they would have
you believe, that is, unless you have the misfortune of opening a door
when the horde is right on the other side and attack you before you realize
what hit you. If you see Acid Beasts (Boss = Deathspit) on Dlvl6 and Poison
Spitters (Boss = Chaoshowler) on Dlvl 8, be extra careful when you see
a Boss-light over the wall.
If the party is lucky
enough to have found any Magic resist items, it’s a good time to
let the mage borrow it for this task. Use the standard Mage Shotgun formation
mage open door, Firewall, close door. Be quick about it, don’t let
one off them jam the door. The warrior and rogue should be positioned
one on each side of the door just in case the door is jammed. In that
case, the mage should run for cover because he will be the target for
the spits. He needs only to take a few side steps to get out of the angle
of attack (the door blocks mostly all spits), just go straight behind
the warrior or rogue while they whack at them one at a time. After the
mage regains his composure, he can cast more Firewalls using the casting-into-opened-room
technique to help out. Just make sure you don’t fry your partners
in the process.
 |
 |
Unlike their nasty
cousin Plaguewrath, Deathspit and Chaoshowler are actually nice little
puppies. They just want to protect their territory like all good dogs
do. Advance slowly when you are expecting them; don’t invade their
privacy. If the party came upon these hordes in an open area...
 DON’T
PANIC! Calmly step back one of two squares, they won’t chase
you if you don’t run and their limited-range spits won’t reach
you. The easiest way to take them out is to cast Firewalls on them but
Lightning and Firebolt does a nice job too. The rogue can also help out
with a bow here. The important thing to remember is - when you retreat,
don’t turn corners (if you can help it) they will only chase you
until you run into a dead end. Simply take a step back. Btw, they do not
move when attacked, so take your time and enjoy the campfire while they
bake. DON’T
PANIC! Calmly step back one of two squares, they won’t chase
you if you don’t run and their limited-range spits won’t reach
you. The easiest way to take them out is to cast Firewalls on them but
Lightning and Firebolt does a nice job too. The rogue can also help out
with a bow here. The important thing to remember is - when you retreat,
don’t turn corners (if you can help it) they will only chase you
until you run into a dead end. Simply take a step back. Btw, they do not
move when attacked, so take your time and enjoy the campfire while they
bake.
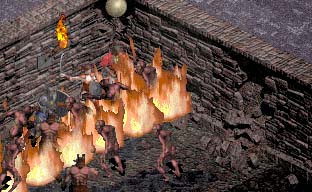
If other monsters
accompany the Spitter horde and if you know the party can handle the monsters
minus the Spitter horde, then just dig in and fight where you stand. Fall
into the Wall formation as if there’s a wall behind you. Set a few
Fire Walls into the Spitter horde as well as a couple more in front of
the party for melee monsters.
Roomful
of archers
How to kill a small room full of archers that won't chase -
This will require
a coordinated team effort. The team should rush the room together, agreeing
before hand (for example) the warrior would go in first and takes the
right side of the room, then the rogue and takes the left side of the
room. The mage should go in last and position himself 2 steps form the
doorway (don't block the door) and take out the center column. This should
effectively split the arrows between the warrior and the rogue reducing
damages and the chance of stun/block-locking the warrior, and the archers
would ignore the mage as a target altogether. The mage may also position
himself a Knight’s Move behind the warrior and use CB safely.
Use the same tactics
with a large room of skeleton archers. The different here is the warrior
and rogue need not get too close to the horde, they are mainly acting
as shields for the mage while he fires off quick successions of Holy Bolts
(or Firebolts if HB is not known). The warrior need only get close enough
for the mage to see the skels. The warrior can then stand still if he
has enough Dex to block or use happy feet to dodge the arrows. The mage
should try to walk behind and off to the side of the warrior to avoid
strayed arrows. The rogue has two options here - Use a shield and take
up position a bit away from the warrior to split up the arrows, or walk
beside the mage (behind the warrior) and attack with her bow.
See also: Charged
Bolt on Knight’s Move, TPKill2 - Hit and Run.
|